
In the journey toward motherhood, the breastfeeding period is both wonderful and challenging. To help new moms better adapt to this stage and make the breastfeeding experience smoother and more enjoyable, we will guide you through the installation and use of the KISSBOBO GLE10 breast pump. The GLE10 breast pump, with its innovative design and user-friendly features, aims to provide the most comfortable nursing experience for both mother and baby. From proper preparation to assembling the pump, and choosing the way to wear it, this article will guide you step by step, ensuring you can make full use of the GLE10 breast pump and make your breastfeeding journey easier and more pleasant.
Installing the Breast Pump
Notice:
Before touching your breasts and the pump accessories, thoroughly wash your hands with soap and water (for at least 1 minute) and dry them with a clean towel or disposable paper towel.
The milk storage container and accessories may be damaged by improper handling, dropping, tightening too much, or knocking over.
Be careful when installing the milk storage container and parts.
Precautions:
Use only the original accessories of this product; otherwise, it may cause airway failure and affect use. Before use, please ensure that the device and accessories are completely dry.
Carefully follow all the steps to correctly assemble the breast pump and accessories; otherwise, you may not achieve good functionality.
Assembling the Breast Pump Accessories:
1.Before assembling, check whether the accessories of the breast pump are damaged and replace them in time if necessary. Before assembling the accessories, be sure to clean the parts according to the following clear steps. Press the silicone T-piece into the inner circle of the milk bucket to seal it.
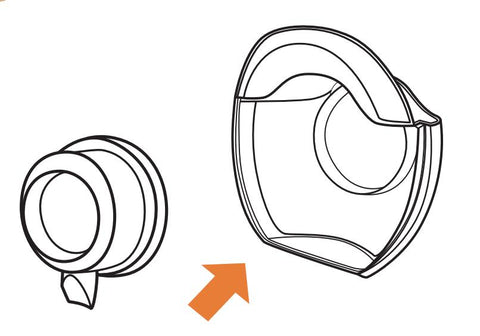
2.During assembly, place the one-way valve vertically downwards, in the middle of the collection box. Press the silicone T-piece into the inner circle of the milk bucket to seal it.

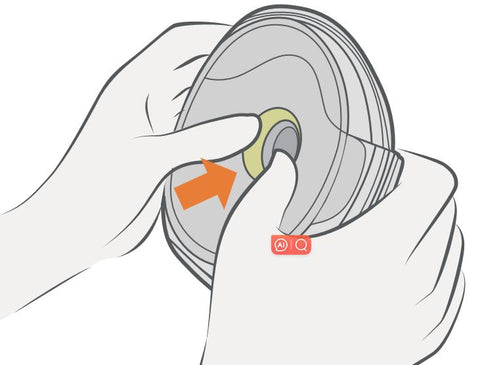
3.Insert the white part in the middle of the silicone flange into the center of the silicone tee.
4.Gently press the middle of the flange with thethumbs of both hands, and gently push thewhite part into the circle of the silicone tee.
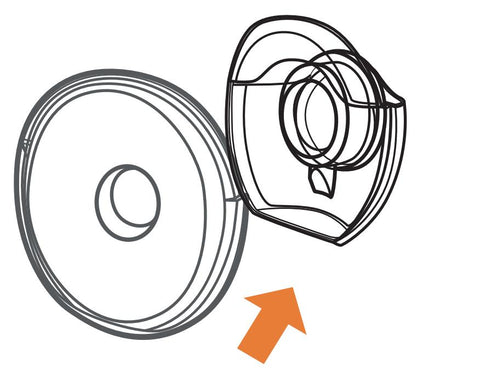
5.As shown in the figure, according to the above operations, press the silicone flange and the collection chamber into the groove of the collection chamber.
Note:
Please make sure that the silicone flange is fully connected with the milk container to form a seal.
6.Align the main unit with the 2 insertion ports of the milk collection box, insert it into the main unit and gently push to combine the two.
Note:
Check whether the host and the milk storage device are properly assembled, whether there is too large a gap between the two, and check whether the silicone plug of the milk bucket is intact.

How to Properly Wear the Breast Pump
Notice:
Does the nipple touching the side of the silicone flange channel cause discomfort?
Have you seen too much areola being sucked into the rubber channel?
Have you noticed the skin turning red?
Are the nipple and areola white?
After pumping, do you feel that no milk has flowed out?
Does my nipple touching the side of the silicone flange channel cause discomfort?
Most of these issues are because you are using a flange that does not fit you. If you are not sure which size of flange suits you, you can read our article on this topic.
You can correctly position the flange, and also check for insufficient power supply; for more details, please consult your family doctor.
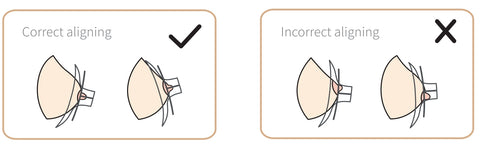
Put the wearable breast pump into the nursing bra so it fits on the breast, and check that the nipple is in the middle and does not touch the silicone flange.
The main machine should wearthe breast pump correctly upward.
Wearing instructions for tucking into a bra
Choose a nursing bra that is the right size and comfortable. A nursing bra that is too loose or too tight can cause discomfort or injury.

After correctly installing the breast pump and adjusting it to the right position, turn on the breast pump and start working. Keep your upper body upright when pumping, not leaning forward or backward by more than 45°.

When the breast pump has finished working, release the nursing bra button and slowly take off the breast pump from above. Do not turn the breast pump upside down during this process!

Notice:
Wearing a nursing bra or breast pump for a long time may cause discomfort. Please be extra careful when wearing and using it.
Choosing the Right Suction Mode and Level
The GLE10 breast pump is designed with three modes (Stimulation Mode, Expression Mode, Depth Mode, which can be adjusted by briefly pressing the "M" button on the dashboard) and 8 suction levels to meet the needs of different mothers. To choose the settings that suit you best, consider the following:

Initial Stage: When first using it, it's recommended to start at the lowest suction level and try the basic pumping mode. This helps you adapt to the feeling of the breast pump and can reduce breast discomfort.
Personal Comfort: During use, gradually increase the suction based on your comfort level. If you feel discomfort or pain, you should immediately reduce the suction or stop using it and consult a professional.
Efficiency and Needs: Adjust the mode and level according to your milk production and pumping needs. If you need to pump quickly, you can choose a higher suction level, provided it does not affect comfort.
Mode Switching: The GLE10 breast pump offers different working modes, such as massage mode and expression mode. You can switch between different modes based on the feeling of your breasts and the flow of milk to promote milk secretion and improve pumping efficiency.
How to Pour Milk
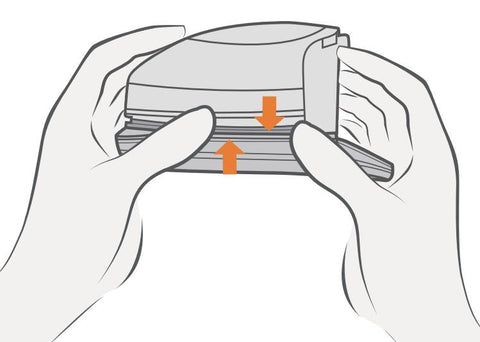
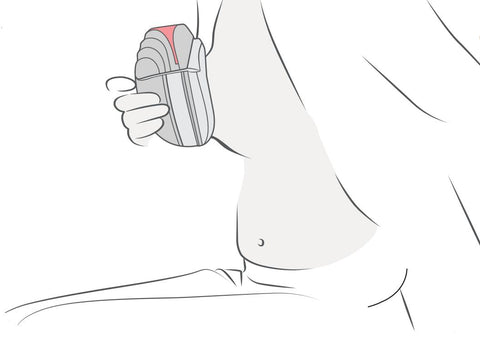
As shown, pull up the main unit.
As shown, after pumping, remove the main unit, align it with the milk storage bottle, and pour in the milk.

Close the PPSU milk bottle with the bottle cap. For information on storing breast milk, you can read this article.

Note: After pumping, please pour the milk into the bottle for storage as soon as possible.
During the use of the GLE10 breast pump, we not only focus on its convenience and efficiency but also value the precious moments of intimacy between every mother and baby. By following the detailed installation and wearing guide in this article, mothers can easily start their pumping journey while ensuring safety and hygiene. Therefore, we recommend replacing the breast pump accessories every 3-6 months. Remember, the correct use and maintenance can not only extend the life of the breast pump but also ensure that each pumping session is a pleasant and comfortable experience. The KISSBOBO GLE10 breast pump is a trustworthy companion on your breastfeeding journey.


